Showing posts with label texture. Show all posts

Tuesday, 22 October 2013

Creepy Castle Tag


I have finally finished my Creepy Castle Tag for the textured Halloween tag challenge at Our Creative Corner. My plan was to create a tag which gave a view in through the window of a long deserted haunted castle.


I started by die cutting a tag from cereal box board and inking it with Black Marble Dylusions ink then randomly stamped Paper Artsy ink splatters in Black Soot DI to add some extra interest. I die cut the window shape and applied multiple layers of Black Soot DI to the frame.


I used texture paste and That Special Touch Stone Wall mask to form the bricks and the same ink splatter stamp pressed in to the almost dry paste to add some extra texture. When the paste was fully dry I blended Pumice Stone and Dusty Concord DI over the bricks. I dried the ink with a heat tool and applied pewter gilding wax lightly over the bricks to further emphasise the texture.


I stamped partial images of spiders webs randomly over the tag to add more interest. The Beware embellishment is stamped and heat embossed and the cardstock aged with Pumice Stone DI and a paper distresser.


I stamped spiders webs and bat stamps on some seam binding with black StazOn and then inked the ribbon with Pumice Stone and Dusty Concord DI.


The tattered curtain is a piece of tulle which has been torn and inked with Pumice Stone DI.


A mini plastic skellie and some metal embellies finish the tag.

And finally, the tag in all its spooky glory back lit by flickering LED candle light!


Hope you like it. Thanks for looking.

Wednesday, 9 October 2013

WOYWW #227


Hello and welcome, how lovely to see you again.

The Moonshine Family seem to be all over the place at the moment with visits to University Open Days at the weekends, so I'm a bit behind with my crafting. (Still haven't stared my Dictionary J page which needs to be finished by Saturday and I haven't even thought about how I'm going to work around my TOTAL lack of TH supplies for the October Tim Tag.)

To tell the truth I've been a bit side tracked by the October challenge over at Our Creative Corner so that is what I'm playing with at the moment...


The challenge is a Halloween tag with texture, so it's out with the texture paste again. The tag on the left is my prototype, but I'm liking how they're both coming on.


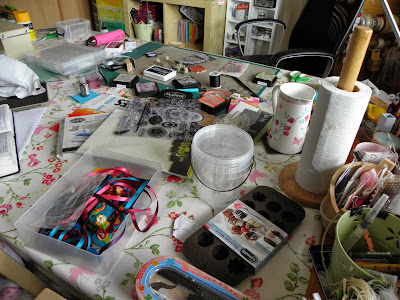
I thought I'd also post a shot from the "back side" of my desk. In the foreground you can see a silicone chocolate mould, which I'm planning on using for some Melt Art embellies, the makings for some felt key rings for my craft stall and two empty olive buckets for storing stuff, on the left you can just see my dictionary which is sending out "work on me" vibes and the rest is the paraphernalia for my tag.

That's all from me, short and sweet today. Thanks for stopping by and I'll catch up with you later.

Quick update - lots of comments about the windows on my tags - they're cut with the Small Gothic Arch die from Poppystamps. MMx

Thursday, 12 September 2013

Tim Holtz 12 Tags of 2013 - September


Once upon a time (30 or so years ago) I was a Girl Guide. I'm not ashamed to admit it, it's a big part of what has made me the independent and practical person I am today. 

When I was a Girl Guide we had a District Commissioner called Mrs Armstrong a lovely (very posh) lady for whom we all had affection and a great deal of respect. Mrs Armstrong was the lady who, apart from her role as Commissioner, tested us for our Camping Badge and the Commonwealth Badge for those few of us who became Queen's Guides. As such she was a stickler for things to be done - just so. Mrs Armstrong was  a "tough cookie" but she was also an inspirational leader whose words have stayed with me to this day. In a difficult situation she would always exhort, "Stick-ability girls! You must have stick-ability!" What she meant, of course, was that however difficult or frustrating a task is, you must keep at it until you've completed it, that you never give up.

Why am I telling you this? Because my September Tag has been an exercise in stick-ability. My completed tag is my fourth attempt at what should have been a pretty straight forward layered stencil technique (you can see Tim's Tag here). I really don't know why I had such a nightmare with this tag, but the problem came not with the layered stencils but with THE most basic step - Distress Staining my tag!

In the end I did admit defeat (I was running out of tags) and switched from DS to Dylusions spray inks and was MUCH happier with the results - I'm wondering if the root of the problem lay in the fact that I don't have a full arsenal of Distress Stains and the colours I do have just weren't working for me - who knows?

Anyway, I hope this explains the sentiment I've used on my tag, and you might notice the brass tag attached to the ribbon - a lucky find from my stash of random stuff!


I really like the effect of the honeycomb stencil on the seam binding.


I used a That Special Touch mica mask (swirls) inked with Gathered Twigs DI in place of Tim's Rays, I really like the effect of the subtle darker shade over the vibrant Dylusions. (Cherry Pie, Lemon Zest and Squeezed Orange)


Love that Cherry Pie ink, it looks great with the black stamping.

I'm pleased with the final result, so sticking at it definitely paid off!

Thank you for looking, please leave me a comment so I know you came and I'll try and visit you too.

Wednesday, 27 February 2013

Sunday Stampers #246 - Texture-tastic Tag

Hello again and welcome.

This weeks Sunday Stampers Challenge (you can find out more by clicking on the button in the side bar) is themed on the song title "You Raise Me Up" and is therefore texture. As my post title suggests I have gone all out on embellishing my tag with different textures - so without further ado, here is my Timeless textured Tag...


And some detail shots...


Just in case you are interested the following shots show some of the steps and individual elements involved in creating this piece.

The tag started off as a greyboard die cut, which I painted with gesso and then stamped with a text stamp in Jet Black Archival. I then swiped over a layer of Weathered Wood Distress Stain and heat set. Next came the first layer of texture, modelling paste applied through a mask. When this was almost dry I stamped in to the paste with a grungy number stamp to give added texture and then allowed to dry fully.


Using an ink blender I applied light layers of Wild Honey DI to the right hand side of the tag and Rusty Hinge to the left, blending a little in various places. Next I sparingly stamped my tiny Harlequin stamp (yet again!) in Rusty Hinge on random "bricks".


I then left this to dry and moved on to the embellishments.

The flourish is die cut from greyboard coated with self adhesive aluminium tape.


I used a Ten Seconds Studio embossing wheel to add texture to the metal tape and then applied Alcohol Inks to colour.


This picture shows the textured and inked flourish layered on to a piece of burlap and placed over-hanging the edge of the tag.


A piece of Tim Holtz Filmstrip Ribbon (adhered with hi-tack tape but allowed to keep its natural curve at the right hand end) adds another layer of texture.


Other textured embellishments include a handmade lace flower (tutorial here), a feather, tiny postcard (stamped onto white cardstock, inked with Antique Linen DI to "age" and edges distressed with a distressing tool), a salvaged Christmas lights bulb (stripped of its plastic socket and inked with Butterscotch Alcohol Ink), a  K and Co Words To Go - well - word, inked and distressed as before and pushed in to a memo pin and finally a faceted gem.

I also used some gold microbeads here and there on the brickwork to add yet another layer of texture and interest.

Supplies used are as follows...

Cutting Dies

Sizzix BigZ / Tim Holtz Alterations - Tags and Bookplates and Elegant Flourishes

Stamps

Text - PaperArtsy Hot Picks
Grungy numbers - PaperArtsy Ink and the Dog Minis 23
Postcard - Papermania Urban Stamps - Bookprint, Around the World 2

Inks

Ranger Archival - Jet Black
Distress Inks - Wild Honey, Rusty Hinge
Distress Stain - Weathered Wood
Adirondak Alcohol Inks - Butterscotch, Espresso, Rust

Other

Mask - That Special Touch Mask - Bricks
Seam Binding - Angel Crafts
Burlap - Hobbycrafts
Filmstrip Ribbon - Tim Holtz Idea-ology Findings
"Timeless" - K and Co. - Black and White Words to Go
Faceted gem - Making Memories - Paper Reverie - Metalique
Red gem brad - WHSmith
Wooden bird - Kars
Microbeads - Accent beads
Memo pin - Tim Holtz Idea-ology Findings
Cotton Crochet Lace and Feather - from stash

That's all for now, off to make dinner... Thanks for stopping by.


Related Posts Plugin for WordPress, Blogger...