Wednesday 21 August 2013

WOYWW #220


Hello and welcome to another Wednesday and a whistle stop tour of the world's crafty workdesks.

As ever we are grateful to Ms Dunnit over at The Stamping Ground for hosting this amazing event. Pop on over there to find out how to join in.

To business... and what is on my workdesk today?

I'm afraid it is back to work time here at Moonshine Manor. I've been putting it off all year but the Christmas Craft Fair season will soon be upon us so I've dusted off the old sewing needles, and am nose to the craft mat making stuff. (Until I have a new Tim Tag or dictionary page to do any way!)


So today you can see: lots of embroidery floss, some die cut felt shapes, beads and buttons, the original jar of hearts (not sure Christina Perri had this in mind when she wrote her song), my trusty rotary cutter, quilting rule and my pin (needle) cushion which is currently sporting some very fetching scrapbooking pins which I need to make a book for.

So that's all from me - back to work - those robins don't make themselves you know...

Monday 19 August 2013

O is for... Oiseau


Hello there!

Time for another entry for The Craft Barn's Dictionary Challenge. (My don't these fortnights come round quickly!) This time it is the letter O - with no twist.

An easy pick for me this time round. As I'm using a French-English dictionary (and if you know me well) my O word could only be Oiseau - which is French for bird.

Put my love of all things birdy together with my Inkadinkado "Bijoux oiseaux" stamps (gem stone birds) and we have an un-ashamedly simple entry for the challenge.

I have taken these pics under a halogen light to get the effect of the gold embossing, but it seems to have bleached the colour a little... any way here are my pages.


I've kept to my overall feel with this simple gold and red colour palette.


I quite like the peculiar way the embossing powder has clung to the text.

That's all from me, thanks for looking.

Oh yes, a special message to my Craft Barn visitors who use Facebook - sorry I can't leave you any comments, but I always come and look and thank you very sincerely for the lovely comments you leave here.


Saturday 17 August 2013

Faux Batik (resist) Technique - Tutorial Part 2


Hello again and welcome to Part 2 of this tutorial.

You can find Part 1 here
and the evolution of a journal page here

In Part 1 I showed you how to use heat embossed stamped images as a resit for sprayed Dylusions inks. In this tutorial I am going to take a different twist on the technique and show you the results when using the same basic principles with an embossing pen.

I wanted to explore the faux batik technique a little further to produce the focal image for my journal page. I knew that somewhere in my stash I had a Whispers Embossers pen and I was intrigued to see the results of using the technique with a hand drawn, rather than stamped, design.

I decided that my focal image was going to be a "sort of" peacock. "Sort of" for three reasons, firstly my drawing skills are not good, secondly because the colours I needed to use to co-ordinate with my background were NOT traditional peacock colours, and thirdly because I was going to make the tail from leaf, rather than feather shapes.

You will need:

White or Manila cardstock (I've used white)
Pencil
Black pen (see Step 6 below)
Whispers Embossers pen
Clear Embossing powder
Heat tool
Dylusions spray inks
Kitchen roll
Scrap or brown (not greaseproof) paper
Iron
Scissors
Wet glue
Graphite or charcoal pencil

Step 1

Draw and cut out cardstock for peacock body and leaf/feather shape.


Step 2

Draw round templates to get idea of overall design and number of feathers required.


Step 3

Draw round the template to create enough feathers for tail design (plus a couple of spares).

 Step 4

Draw your feather/leaf design with the embossing pen and then cover with clear embossing powder, shake off the excess and return to the pot. I did one feather at a time as I wasn't sure how much drying time my Embossers pen would give me.


Step 5 (not shown)

Use your heat tool to melt the embossing powder.

Step 6

Spray your inks randomly over the entire page. You can flick water on to the page if you like. Then roll over with kitchen towel to remove excess ink. Allow to dry.


Rather stupidly I didn't use a permanent ink to draw these shapes - so when I sprayed the very wet ink my lines bled - badly. Using the maxim, that there are no mistakes in art - this meant that I could still cut out my leaf shapes but would not have to ink the edges - ta dah!


Step 7 (not shown see tutorial Part 1 for pics)

Place a piece of brown (shiny side up) or scrap paper over the embossed design and iron with a DRY iron until all the embossing powder has been melted and lifted off the inked page - you will see greasy looking marks appear on the scrap paper. If the scrap paper gets stuck just keep ironing until it lifts off.

Step 8

Cut out the leaf shapes and arrange behind the body. I glued mine with  Scotch Quick-Dry Adhesive, sticking only the bottom of the leaf to give some dimension. The body was cut from a piece of cardstock randomly sprayed with co-ordinating ink, some ink splatter stamping and the edges were inked with Black Soot DI.


Step 9

The addition of an eye, beak and top knot gave the bird some personality.


Step 10

I used a soft graphite pencil to add definition around the outside of the bird


And a harder graphite pencil to give definition between the leaf shapes.


Step 11 

Using the same resist technique I created my quote using alphabet stamps and Black Marble Dylusions ink on white cardstock. The quote is the first line of a 17th Century poem which kind of fit the bill...


So there you have it, my completed journal page using two takes on the Faux Batik (resist) Technique. I hope you enjoyed it and that you will give it a go - if you do please let me know - I'd love to see what you create.

Thanks for looking


Wednesday 14 August 2013

WOYWW #219


Hello fellow Deskers! And if you're not a Desker - you're missing out - go over to Julia's and get involved - go on, you'll love it!

(Apologies for the weird lighting today - it is a GORGEOUS morning here in sunny Staffordshire (Note to Self: must put some washing in) so I've had to close the blinds or else all you'd see would be glare.)

Today I am mainly playing nice with a Julie Nutting (for Prima) Doll Stamp. I've got a couple of unfinished journal pages which I'm planning on giving a She Art style look so I'm playing at paper piecing a She to be the focal image of my Art. I love the look of text pages for faces (I really like how it worked with my Gorjuss girl mixed media angel here) so I'm seeing how that works with this stamp.


You know the saying "Necessity is the mother of invention"? Well... I thought I would have had an acrylic block big enough for the Doll Stamp amongst my vast selection of acrylic blocks but, incredibly, I didn't - sooo... I took the liner tray out of the tin I use for storing my Pitt Artist pens flat, turned it over ...


...and Bob's your uncle - THEEEE cutest stamping block ever!


Also on my desk today is my Tim Tags prize which arrived yesterday. The prize was a $25 credit to spend at one of Tim's sponsor's stores, so I chose Journeyman Tissue Tape, Traveller Tissue Tape, Idea-ology Word Bands and a Prima stamp. Thank you Tim! Oh I do love happy mail!


Whilst I remember - a couple of my lovely WOYWW visitors last week asked for a tutorial on the Faux Batik (resist) technique I featured in my post. Part 1 of the tutorial can be found here, a second post about the evolution of the journal page I was working on can be found here and Part 2 of the tutorial will appear as my next post - coming soon. (here)

Thanks for visiting

Tuesday 13 August 2013

Evolution of a Journal Page


Hello again.

In my last post on the faux batik (resist) technique I left you with an ink and resist background for a journal spread. I have been working on that journal spread and thought you might like to see how the page has evolved.

This is how the page looked when we left it:


I have been working on building up layers of interest in the background. (I am at the start of a new journal so I'm trying to keep the pages fairly flat to make working on subsequent pages easier (lesson learned from the Dictionary Challenge!) 

The first layer uses the same five colours of Dylusions I used earlier (Lemon Zest, Squeezed Orange, Pure Sunshine and Fresh Lime and London Blue), but this time randomly sprayed through a circle stencil.


I love the contrast of black stamped images on my journal pages, so I picked a flower themed stamp set, archival ink and set to work, firstly stamping two different styles of flower


and then using the flower centre stamps firstly to break up some of the white circles left by the resist technique,

and secondly to add some more intense black contrast. I don't usually mount my stamps on acrylic blocks when I'm layering in a background, preferring the partial stamped image you get when you "roll" the inked stamp over the page using your fingers. This time however I did mount the stamps as I wanted a crisp image.

The picture below also shows the next step, which was to colour with a POSCA paint pen through the circle stencil. The POSCA pen gives a lovely matte, chalky and slightly textured finish when dry.


I recently bought a Paper Artsy Minis stamp (MN72) which is an ink splatter image (I know what you're thinking - "You can achieve that look by flicking ink at the page - why would you buy a stamp?" well... sometimes I think you need a bit more control)


I thought I'd give the stamp a workout and I was really pleased with the results. (This stamp will be on the "stamps to be kept close at hand" pile from now on!)

Cunningly the next photo shows the effect of the stamped ink splatters (black) and genuine Dylusions White Linen (er - white) splatters - now, which looks more like your idea of an ink splatter? I rest my case m'Lud.


All the layers of images on the page were looking very circular and "blobby", so I decided to add a little contrasting shape by printing black lines with archival ink using a cut up credit card.


Finally I added a some stamped text (Chocolate Baroque's  Artistic Affirmations - LOVE these stamps!)


Here is the "finished" background - who knows - I might go back in and add something else at a later date - that's the beauty of art journaling...


The observant amongst you will have noticed that I've only shown you one side of my two page spread. I will be posting a Part 2 to the faux batik technique tutorial which will show a different look using the same basic technique, so do keep an eye on your blog roll or bloglovin' feed. You can now see Part 2 here.

Thank you for stopping by.

Friday 9 August 2013

Faux Batik (resist) Technique - Photo Tutorial - Part 1


Hello friends!

I had so many lovely comments about the faux batik tag I posted on Wednesday that I thought you might be interested in a quick tutorial. This post is photo heavy but I think it helps make sense of the technique.

I learned this technique at the monthly Art Journaling class I attend at Crafty Bunch in Telford so I must thank our lovely and super talented teacher Kaz Hall for kindly allowing me to share the technique with you. You may have seen some of Kaz's work in recent issues of Craft Stamper, if not pop over to her blog The Little Shabby Shed and check out her amazing work, she's a really lovely lady and always happy to welcome new visitors.

On with the show then...

Firstly a reminder of the sample tag I posted on Wednesday...


There are two things to keep in mind as you look at the tag, firstly the cardstock is manila cardstock (I'll come back to this later)  and secondly the photographs have been taken directly under a halogen bulb so you are seeing a very exaggerated sheen on the piece.


For the tutorial I am going to show you the same technique, but instead of on a tag it will be a background for a journal spread and will be on white cardstock, 

The idea behind this technique is to create a design which resists the coloured ink you are applying to make your background, leaving the design in the substrate (cardstock) colour rather than as a black or coloured stamped image.

You will need:

Embossing Ink (such as Versamark)
Clear embossing powder
Heat tool
Scrap or brown paper (not greaseproof)
Your chosen substrate, eg cardstock, tag, journal - a light colour will work best
Stamps and or stencils
Dylusions spray inks
A kitchen roll
Iron
Heatproof surface (eg craft mat)

Step 1.

Ink your chosen stamp with heat embossing ink and stamp the image on to your cardstock.  (You can also press the Versamark through a stencil. (Make sure you clean your stamps and stencils carefully afterwards as embossing ink is very sticky))
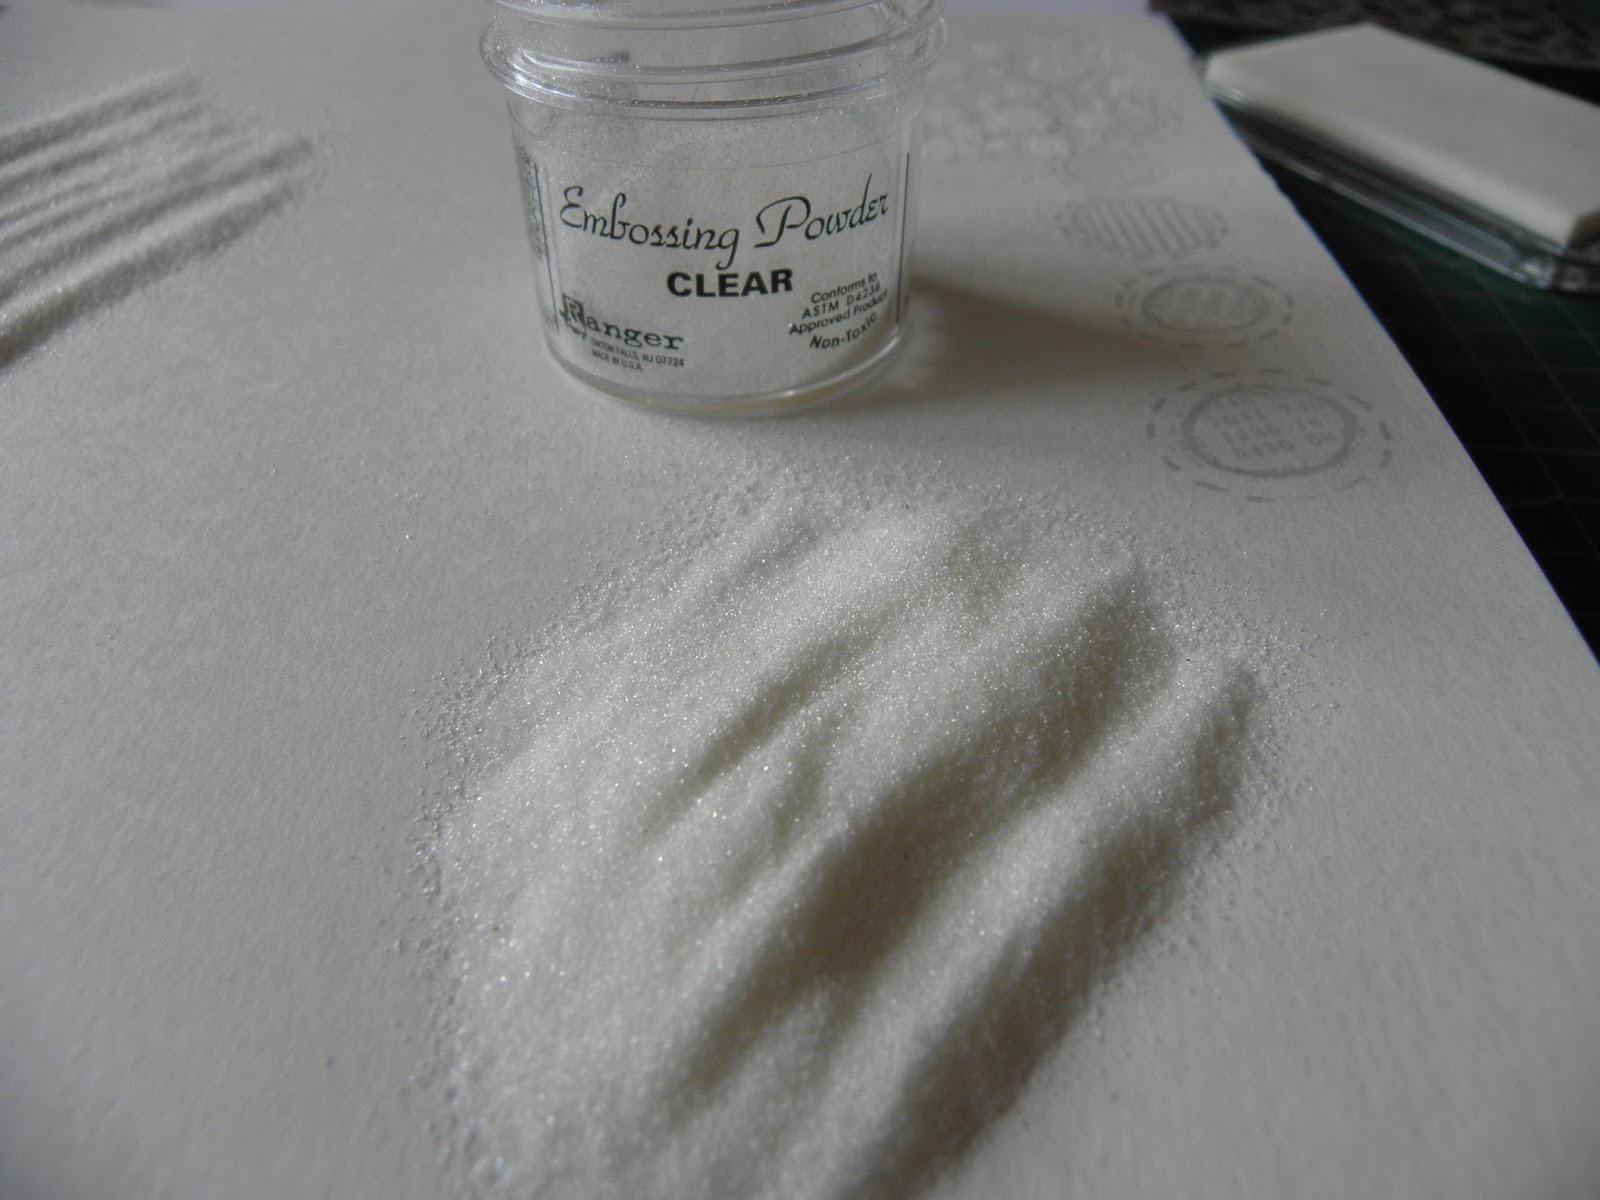

Step 2.

Pour clear embossing powder over your inked images. If you are doing a large project (mine is a double A4 spread) you may need to repeat steps 1 and 2 rather than do it all in one go so that your ink doesn't dry before you get your embossing powder on. I completed my stamped images in one step and then the stencilled images in another.


Shake off the excess on to a piece of scrap paper and return to the pot.


Don't worry if you have some specks of embossing powder floating around it all adds to the effect
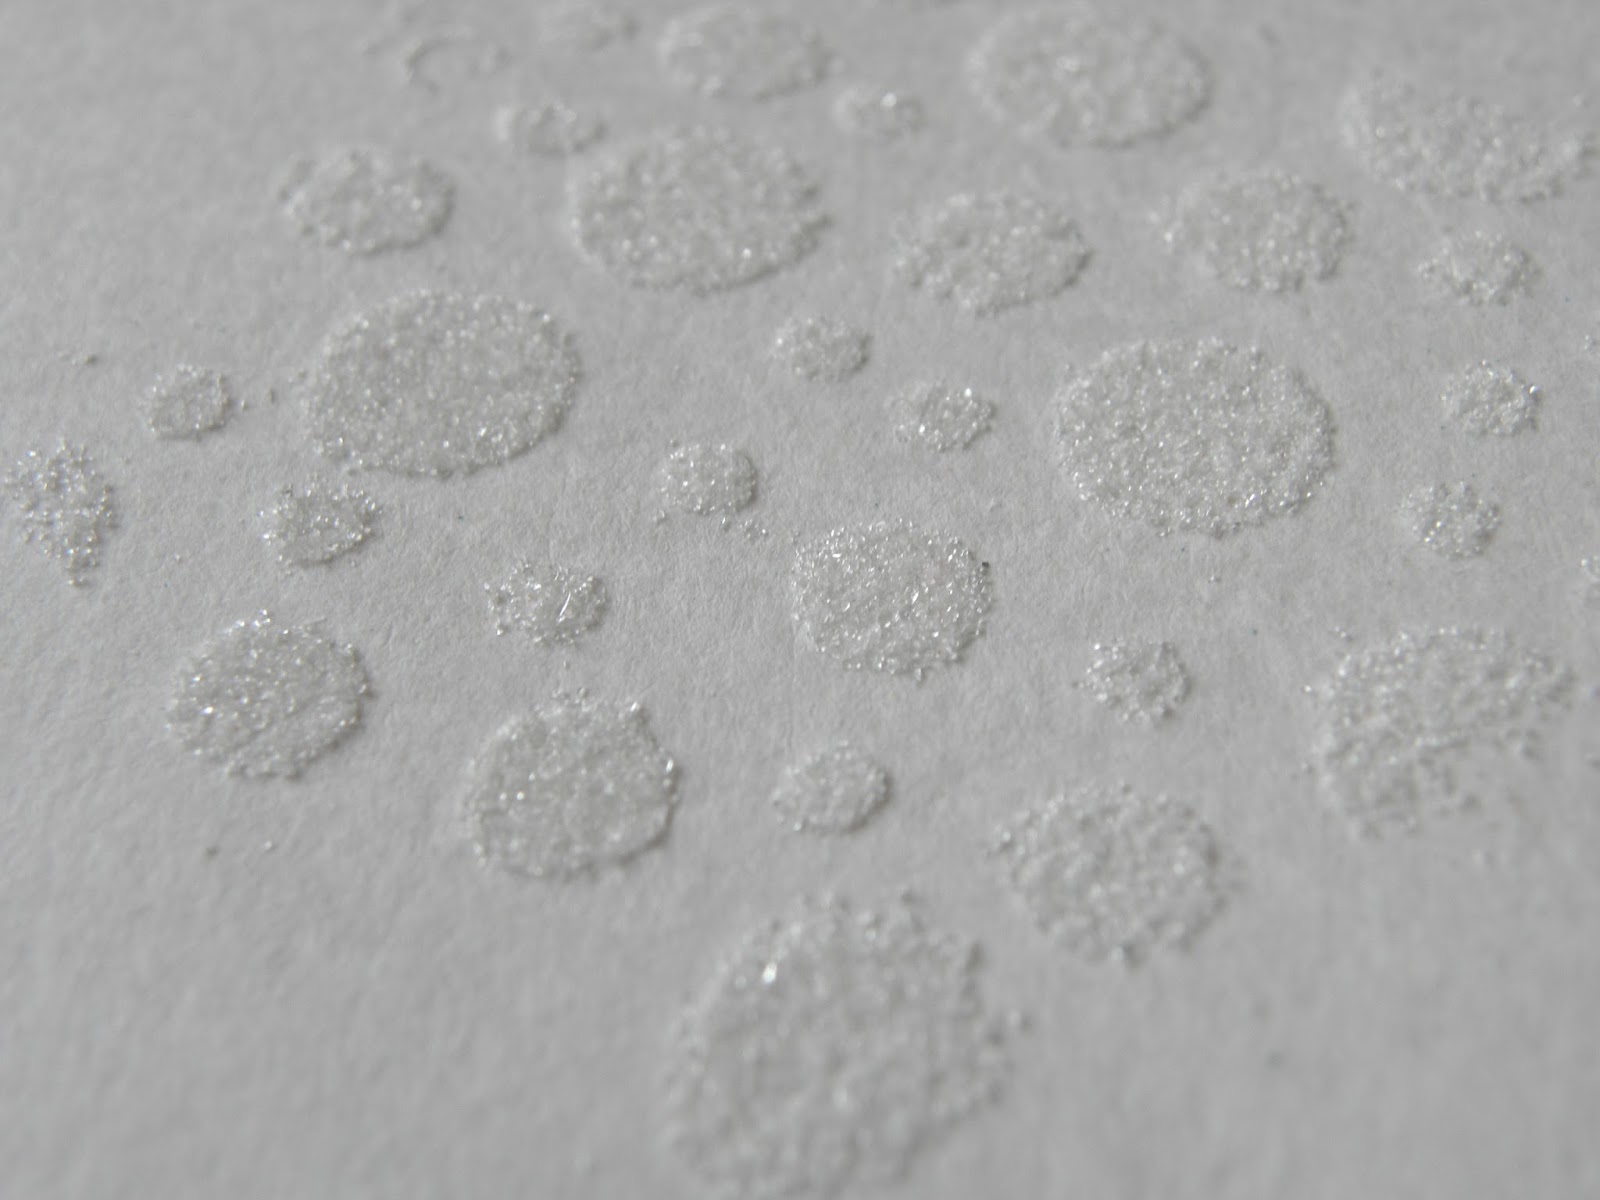
Step 3.

Melt the embossing powder with a heat tool - enjoy the magic!


Step 4.

Working quite quickly, spray your inks randomly over your cardstock, you will get great blends where the colours overlap. You can also spritz with water to get the trademark Dylusions reaction look. Be careful not to over ink or you will get a very muddy colour.


Roll a full kitchen roll over the wet ink to take off the pooled ink before adding more colour in the spaces if necessary (this helps stop the muddiness). Repeat this again when you have finished inking to remove all excess ink.


You can see where the heat embossed images have resisted the ink.


Step 5.

Place scrap or brown paper over the cardstock (if using brown paper place it shiny side UP) and then iron over it with a reasonably hot DRY iron (DO NOT STEAM)


Eventually you will see "greasy" looking areas appear on the scrap paper, this is the embossing powder melting and being lifted off.


If, when you come to lift your scrap paper off, you find that it has become stuck, simply re-iron until it comes free.

Your finished faux batik piece will show your stamped/stencilled design in the colour of the substrate on a coloured  background.


You can then go on to decorate this further. In the tag above I have over stamped the same foliage stamp in black archival ink to make it pop and I've added some gold metallic dots around the leaves.

The technique followed was exactly the same for both samples but you will notice the two very different effects given by the colour of the substrate, the tag (manila) has given a lovely golden glow to the batik effect, whilst the journal spread (white) is quite a stark contrast. 

The sheen on the tag has come from sections of the embossing which haven't quite lifted off when ironed. You could experiment with different iron temperatures to see which effect you prefer. 

I do hope you will have a play at this technique,  all of my classmates really enjoyed trying it and we had some great - and surprising results.

I'm off to work on this page some more. Thank you for looking. Enjoy!


P.S. You can see how this page is coming on here
P.P.S. You can find Part 2 of the tutorial here


Related Posts Plugin for WordPress, Blogger...