Showing posts with label Card. Show all posts

Wednesday, 26 June 2013

WOYWW #212

Good morning fellow deskers!

A very quick post from me today as I'm off to get the car MOTed today - fingers crossed!

I've mentioned before that I am not much of a card maker, but this week that seems to be mainly what I'm up to.


(In case you were wondering, I was looking on line to see if I needed to cut my poppies back hard now they have finished flowering - the answer is - yes.)


I've just finished making a little notecard. It is VERY simple but I really like it.

Typewriter stamp - Pink Paislee: Daily Junque (LOVE these stamps), Sentiment - Inkadinkado: Picket Fence both stamped in Coffee Archival.

And finally, my Mother in Law is not very well at the moment so I've made a get well soon card for her...


Molly Blooms stamps - Molly with Caterpillar MB-0004H, Flowers MB-0144E

Molly coloured with Copics (numbers) and Promarkers (colour names)

Skin: E0000, E00, E01
Cheeks: RV10, R20
Hair: E31, E35, E37
Top and shoes: RV13, RV14
Socks: E40,  RV10
Trousers: E40, E41
Hat; Powder Blue, Denim Blue
Caterpillar: YG95, YG97
White highlights - gel pen

Flowers coloured with Distress Inks, fine paintbrush and a little water using Mowed Lawn, Scattered Straw and Spun Sugar.

That's all from me, catch up with you later - unless the MOT bill is so huge I'm having a lie down!


Sunday, 16 June 2013

Happy Father's Day - a two for one


Good morning all and Happy Father's Day to all those hard working and badly misunderstood dads out there!

Two things to show you today, first up the finished Father's Day card I was working on in my last post...


A close up...


The colouring is done with a combination of Copics and Promarkers. As a newbie to this kind of colouring I always struggle to work out which colours to use where. So I thought I'd list the colours I've used FYI. Colours listed by number are Copics (I use a combination of Ciao and Sketch - if I can't buy a shade as a Ciao I'll get it as a Sketch), colours listed by name are Promarkers.

Skin: E0000, E00, E01  Cheeks: RV10, R20
Hair: E33, E35
Hat, Jacket and Trainers: W-0, Ice Grey 2
Trousers: YG91,YG93, YG95, YG97
Honeycomb frame and Branch: E31, E33, E35
Honey: Y06, Oatmeal, Honeycomb, Gold
Bee: Honeycomb, Gold  (plus black gel pen for stripes and Sakura Gelly Roll Clear Star for wings)
Leaves: YG91, YG93
Beehive: E40, E41, E43 plus Cocoa and Shale for entrance
Heart: Ruby, Cardinal Red
Sky: BG000

Stamps used:

Molly Blooms: MB-0246F (beehive on branch), MB-0248I (George), MB-0245F (wooden beehive), MB-0115C (sentiment).

NB. the bees on the wooden hive actually come from the George stamp - I coloured them with a dark brown Whispers Strokes pen and then stamped over the hive image.


The left hand patterned paper panel was a necessary "fix" as the alcohol ink in the Copics tends to bleed through ordinary cardstock - but I think it adds a certain something (if not just to make sense of George holding a honeycomb frame which he wouldn't have found in the hive on the front!)


My second Father's Day project is my first ever attempt at properly icing a cake - I mean regal icing not melted chocolate and Smarties or gum slashing Christmas cake snowy peaks. Mr M ordered a homemade, iced cake for Father's Day (he actually wanted one for his birthday in May but I failed to deliver). So a quick trip down the home baking aisle, a dash round the cake decorating stands at TKMaxx and Hobbycraft and about 4 hours of baking and icing anguish later...

Ta dah....


OK so it's a bit girly (I wont tell you what Mr M said - but he's lucky NOT to be wearing it!) but I couldn't see the point of spending money on blokey cutters etc that would never get used again! And anyway Mr M is a big fan of oxeye daisy filled meadows. Both the junior Moonshines helped so it's a real family effort - and I've got to say - that for a first attempt - I'm pretty darned pleased with it!

Well that's all from me - we're having Reverse Father's Day here today and Mr M is cooking us all a Full English Breakfast. (The reverse part wont last until the washing up - but hey ho a Full English is a Full English!)


Sunday, 10 March 2013

Happy Mother's Day and The Secret Project Reveal


Welcome friends - and a Happy Mother's Day to all my UK visitors.

As you will know if you visited on What's on Your Workdesk? Wednesday (WOYWW) I was working on a TOP SECRET project - which was, of course, a Mother's Day card for my lovely Mum.

The card, securely packaged in a Jiffy Bag arrived in the post on Friday. By 12:00 Saturday Mum could resist temptation no longer and opened her card... NAUGHTY MUMMY!

I'm pleased to be able to report that she LOVED it! (Phew!)

Anyway I promised I would post some pics so here we go...


And some detail shots...


This is the full shot of the sneaky peek I posted on Wednesday...


The card is made from a Papermania Kraft Stepper Card - but I fiddled with the folds to make it work for my design.

I began by choosing the images I wanted to use and stamping them on super-smooth white cardstock using Memento Rich Cocoa. The images were then coloured with a mixture of Copics and Promarkers. Where I have used decoupage to give added dimension (Molly's hat, apron pockets, the tea towel, oven glove and window blind) I stamped additional images and coloured and fussy cut them out and then adhered them using PinFlair silicone glue.


TOP TIP -  when making these additional dimensional pieces bend the image around a pencil, Promarker or similar depending on the size of the piece and then apply PinFlair to the concave section and a thin smidge of very quick drying wet glue to the edges that are going to touch the background. Press these edges down with a pokey tool to get good adhesion without flattening the PinFlair glue. The pie and bowl of eggs were also curved in this way.


Having chosen the baking theme I decided to set my little scene in the kitchen, so next I cut the background papers for the "kitchen walls" and then inked the edges with Tumbled Glass DI.

The stamps are all Molly Blooms (Having seen my previous post here where I showed the results of a Colouring-In-Therapy (CIT) session, Mum has recently fallen in love with, and bought me, loads of Molly Blooms stamps  - it would have been bad form not to use them on her card wouldn't it?)

The window is made using Molly Blooms Winter Window with the snowy panes removed and a "view" made by stamping and colouring the branch section of the Honey Hive stamp on a piece of card inked with Broken China DI which was then glued to the back of the window frame. The window blind was stamped on to patterned paper, cut out and adhered using PinFlair silicone glue.

The sentiment was stamped in Memento Rich Cocoa on to a Tim Holtz Alterations Tattered Banners die cut.

Supplies

Patterned Paper - Papermania Happy Days 6"x6" designerstax


Stamps - Molly Blooms unless stated otherwise

Winter Window Inside - MB0045 H
Farmhouse Kitchen Shelf - MB0090 F
Molly the Chef - MB0108 I
Apple Pie - MB0109 C
Milk and Eggs - MB0089 E
Honey Hive - MB0246 F

Sentiment - Personal Impressions - Cute Characters Set 2

Inks

Distress Inks - Tumbled Glass, Broken China
Memento - Rich Cocoa

Markers used are as follows

Window Frame, Farmhouse Shelf, branches and brown eggs - Copics E31, E33, E35
Molly's Jeans, egg bowl and pie plate and oven gloves Promarkers B119 Powder Blue, C917 Denim Blue
Blue hearts - Promarker V234 Indigo Blue
Molly's Blouse and cheeks and pale checks on tea towel - Copics RV10, R20
Leaves and drawer knobs - Copics YG93, YG97
Molly's Apron, Hat and white eggs - Copics E40, E41, E43
Flesh colours - Copics E0000, E00, E01,
Red heart and red checks on tea towel - Promarkers R455 Ruby, R244 Cardinal Red
Pie crust - Copics E31, E33, E35 and Promarker O555 Gold
Freckles, highlights and spots are all white gel pen


This was such a fun project - apart from the CIT - which is always good, I really enjoyed putting together various elements of different stamps to make a "unique" scene. 

Molly Blooms has new stamps coming out (hopefully this month) so I'm sure there will be more CIT sessions in my craft room soon!

It only remains for me to say. Thanks for the stamps Mum, have a very happy Mother's Day - I love you.


Wednesday, 24 June 2009

BETTER LATE THAN NEVER

Hello Lovely Blog Followers! I hope you're enjoying this gorgeous weather we're having at the moment!

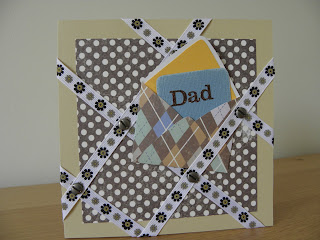
I know it's a few days late but, I thought I'd share with you the Father's Day card I whipped up whilst waiting for The Gas Man NOT to arrive last Wednesday - don't get me started! I did one for Mr M from the boys and one for my Dad.


Father's Day Card

Close up
I'm really pleased with how it came out, masculine yet attractive, I think. The papers were from a TrimCraft Lads n Dads stack, the ribbon is Hobbycraft and the brads are probably Rayer, but as I decant all my brads in to divided storage boxes I can't say for sure.


I'm currently working on a top secret project for my Mum's birthday in July, I can't show you the progress as she is one of my followers and I don't want to spoil the surprise. I promise I'll post it after the 14th of July.

NEWSFLASH NEWSFLASH NEWSFLASH

Exciting news over on Maisie, Maisie Garden Crazy click here


Wednesday, 10 June 2009

HELLO KITTY POCKET CARD - THE PHOTOSTORY

This is the card I made for the June Recipe Challenge over on my challenge site @ Maisie Moonshine's Mojo Monthly. The ingredients which must appear in the project are stickers (Hello Kitty from a Hello Kitty activity book), Ribbon and Bling. Here's how it was made.

Step 1

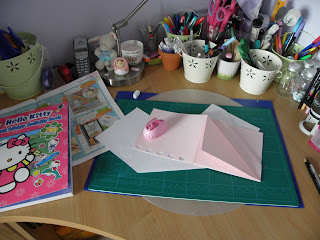
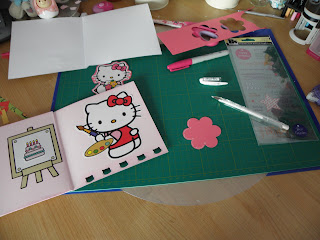
12 x 12 pale pink cardstock scored, cut and folded to the template in June's Papercraft Inspirations magazine. Then a line of Hello Kitty (HK) shapes was punched out of the inside of card (punch from W H Smith) punched shapes retained for later.

Step 2

Co-ordinating patterned paper triangle cut and adhered to front of card. All edges, inside and out, chalked with dark pink and shimmer pink chalks. Sticker adhered behind rear flap so that Kitty looks like she's peeping out from behind. Large HK sticker matted on dark pink cardstock and cut out.

Step 3

Large HK stickers and two dark pink cardstock flowers, doodled with white ink, (for the sentiment) adhered inside.

Completed card

To finish, a length of pink velvet ribbon, large matted Kitty sticker and additional stickers were adhered to the front of the card, those on the pocket carefully placed to be hidden behind the goodies to be inserted later. Additional Hello Kitty shapes were punched out of co-ordinating card for confetti.

Inside of Card

Inside the finished card.

Card with goodies

The finished card filled with Hello Kitty goodies.

Envelope

And finally... the envelope

The card was made for The BGF's daughter who was 9 on Friday and IS the world's No.1 Hello Kitty fan. I made her a mermaid pocket card last year and The BGF happened to mention that her daughter had taken the card in to school the day before her birthday and was "just wondering" if I might be making a card again this year. I'm glad I didn't let her down! I'm also pleased to report that she loved the card and all the goodies and her mum didn't even mind the Hello Kitty confetti that showered all over the kitchen floor!

All in all a successful project and lovely to do something so girlie!

Related Posts Plugin for WordPress, Blogger...