Showing posts with label art journal. Show all posts

Thursday, 17 April 2014

Not so Messy Monochrome

Hello and welcome.

I have been in somewhat of a creative slump lately and not spent much time in my craft room, but I have been enjoying the delights of YouTube and the hours of amazing videos of other people's creativity. Just entering "mixed media" in the search box has turned up loads of inspiration and some interesting artists.

One in particular is Jennibellie and I have decided to join her Journal Workshop ning site. One of the groups on the site is the Monthly Challenge and the challenge for this month is to create a messy monochrome art journal spread with the use of a maximum of two highlight colours.

OK - so as my post title suggests, I didn't score too highly on the messy part of the challenge - but this is where the inspiration took me, and after such a dry spell, I went with it...


The background is Dylusions Black Marble, and, although you can barely see it there are also random stampings of various Kaiser Craft texture stamps in Jet Black StazOn. Additional texture was added by flicking water splashes on the Dylusions and then picking up the colour with kitchen towel.


The trees are white and green acrylic paint and applied thorough the Crafter's Workshop  TCW171 Tree of Life template. The green tree was outlined with charcoal pencil and over painted with Cosmic Shimmer Meadow Lush mist to give a hint of shimmer.


I'm making a real effort to do some stash busting this year so I've used letter stickers from my stash for the page title. The white letters are American Craft Remarks "Sarah Script" and the green letters are Making Memories green Puffy Alphas. I coloured over the Puffy Alphas with Promarkers to try and match the green to the tree a little better (It changed colour from a yellow green when I applied the shimmer mist).


Finishing touches were to outline the white letters with a fine black pen, outline the green letters with white ink, apply watered down white acrylic splashes over the whole page (masking the green tree first), draw a line and dots border around the page with a Posca paint pen and finally add three die cut felt bird embellishments.

It isn't a messy monochrome but I'm really pleased to have felt creative again!

Thanks for looking.

Wednesday, 16 April 2014

WOYWW #254

Good grief is that the time! The Minor Moonshines are on school holidays at the moment and I must confess it is all very chilled out here at Moonshine Manor - so much so that I had no idea it was a quarter to two - must go and make some lunch!

Before I do that though, here is a quick look at what is on my workdesk this gorgeous, sunny and warm Wednesday - to be honest there is more activity on the washing line today, but since I have actually managed to produce something creative this week I thought I would share it with you. (Why? go here to find out).


I've been playing in my art journal, and this is my page for a challenge over at Jennibellie's new  Journal Workshop Ning site.

Short and sweet today - just as our hostess likes it, hope the weather is lovely where you are.

Friday, 21 February 2014

Craft Barn Q & L Challenge - Strong


Ooops - I'm sneaking in a bit late with this one!

Time for another challenge at The Craft Barn and this time I have chosen the word STRONG for my quote book.

I am trying to find quotes which are meaningful to me in some way or another, and this one spoke volumes...

"Even strong women need an arm to lean on now and again" J D Robb

I've gone right out of my comfort zone with this layout. As you probably know, I don't rate myself as any kind of an artist, so to put a face I've drawn on my project is a bit of a biggie for me.  I've been studying YouTube tutorials hard and I was inspired to paint this Whimsy Girl, and she seemed to fit the quote, so here she is...


Backgrounds are brought to you by Dylusions ink sprays in Bubblegum Pink, After Midnight and Vibrant Turquoise.


And Whimsy Girl II is brought to you by Caran D'ache Neocolor IIs and a few details added with Midnight Blue Cosmic Shimmer Mist.


I hope you like her.

Thursday, 30 January 2014

Sssh - Pray Silence for The Craft Barn's Q&L Challenge


Hello and welcome fellow crafters!

Time for another entry into The Craft Barn's Quotes and Lyrics challenge. (Click on the link to get all the details). This time the prompt words are silence and dazzle.

You may be aware that I'm putting together an AJ style quote book with blank spaces on my pages so that I can collect more quotes as I go along. For this challenge I have chosen the word SILENCE and a beautiful and thought provoking quote by Ruth Fishel,

"I will take time to be alone today. 
I will take time to be quiet. 
In this silence I will listen... 
and I will hear my answers"


It is VERY unusual for me to use my own handwriting on ANY layout, but for some reason today I don't seem to hate it quite as much as usual, so it is making a VERY rare appearance!


This layout has been a bit of a love/hate project. I hated the background when I first painted it. It is two colours of blue acrylic over a VERY loud and busy floral tissue paper. The paints seemed to be really grungy and produce a miserable January-esque sky colour - topical, but NOT what I wanted!

A quick spritz with some London Blue Dylusions lifted things immediately and I could see that the layout had potential. Additional background layers came from an Indigo Blu circle dot background stamp, randomly stamped in black Archival and some texture paste layered through a dotty mask. I had hoped that the texture paste dots would remain white for some contrast, but as it dried it soaked up the colour from the underneath layers - oh well... A few splats of White Linen Dylusions completed the first "go" at the background.


The die cut clouds were inked with Faded Jeans DI and adhered to the page using  Scotch quick drying glue. I didn't use matte medium as the Dylusions are water reactive and would have "run". When the clouds were dry I went round the edges of them with a Faber Castell Big Brush marker and smudged the line to blend. This really anchored the clouds on the page. The title is made from Papermania Mini Alpha stickers (keeping up with my stash busting resolution!).

Next I die cut the birds - I was originally going to keep them white, but ended up colouring them black, and stuck them to the page - this time with a smear of matte medium on the back but not on the front.  They are birds but I think this layout has a bit of a look of a Battle of Britain skyscape about it - the tiniest birds could easily be confused with Spitfires!

Finally I went in with my Paper Artsy ink splatter stamp and randomly stamped with black Archival, making sure to get some splashes on the clouds to ground them on the layout. I used a Craft Stamper freebie grungy border stamp to partially frame the page.


Close up showing: grungy border stamp, ink splats, 
FC Big Brush blending and Faded Jeans DI inking

All in all I'm pretty pleased with this layout, especially as I really wasn't keen on it at first! Please do let me know you came - I'd love to see what you are up to.


Sunday, 19 January 2014

Smile - it's The Craft Barn's Q & L Challenge


Hello again and welcome.

It's January - so it is time for a new challenge over at The Craft Barn.  This year it is the Quotes and Lyrics Challenge. Each fortnight the DT give a two word prompt and you have to find a quote or song lyric using either or both words and design a project using your chosen quote or lyric. If you want the full explanation go here. The current challenge words are "smile" and "up".

I've decided to make a quote book using a Daler Rowney hard-backed sketch book. My plan is to produce an Art Journal style book with my chosen quote on the left hand page and space to include additional quotes on the same theme on the right hand page.

For my first page I've chosen the word SMILE and this sweet little quote:

“There's enchantment in a smile, did you know?
Shall I prove in a wink that it is so?
Watch my mouth grin wide and see,
How quick your lips smile back at me!”

Richelle E. Goodrich, Smile Anyway

I just liked the reminder of how irresistible something as simple as a smile can be.


The background is made using a technique I've borrowed from Vicky Papaioannou (see her YouTube video here - LOVE HER!). I've used some VERY old Papermania 12x12 stack papers cut in to rectangles and randomly stuck all over the page to create the textured background, and then two colours of acrylic paint (NOW I wish I had TH Distress Paints!) over the top, blended with a baby wipe.


I used an orange Posca paint pen to emphasise the joins between the paper rectangles and a little bit of Vintage Photo DI here and there too. I've inked Wild Honey (or Rusty Hinge - sorry can't remember which) DI over a Kaisercraft Doily template and stamped flowers and a Cactus Annie text stamp in Espresso Archival ink to add some extra interest in the background.

Showing the texture of the paper rectangle background

The letters are American Crafts Rootbeer Float Thickers (had these for years too - I'm making a BIG effort to USE MY STASH this year!).

I made the library card pocket from the same Papermania paper as the background and gave it the same inky treatment. (I downloaded the template from Ruth Ann Zaroff at Mirkwood Designs - she has loads of great printable templates)


My plan is to collect additional quotes on tags and store them in the library pocket - the quote I have already is a Paper Artsy stamp (HPXT04).

Well that's it from me, leave me a message so I know you came and I'll come to see how you're playing along soon...

Wednesday, 4 September 2013

WOYWW #222


Hello and welcome back - sorry I couldn't play last week, our router failed and we were internet-less for nearly a week. Tell you something Peeps - you don't realise how much you rely on it until you can't get it!

Anyhoo, the reason you're here is to see what is on my workdesk this "Back to School" Wednesday...

Here is a shot taken from my chair - I don't think I've taken one from here before so it gives a slightly different perspective...


So what can we see today?

My Ikea cubbies which contain, top left to right, my stereo system - can't be without music while I'm creating, a cupboard full of paperwork for work, a plethora of tiny Really Useful Boxes full of beads and you can see in the corner (click on the photo for a closer look) a blue tikki birdhouse pincushion which I made for a WI competition, the far right cubby has yet more beads. Second row, two cubbies of craft books and behind the sewing machine my Molly Blooms stamps and finally a big box of flowers.

To the right of the owls is a handy TKMaxx shelf unit with my collection of Douwe Egberts coffee jars,  I mean, buttons, and below the owls is my Craft Robo and a felt bowl with yet more buttons in (bit of a thing for buttons - can you tell?)

Left to right on my desk are my buckets of pens, tools, glue and stuff, assorted pincushions and my jug for washing paint brushes, on my craft mat is my Dylusions art journal - more on that later, and in front of the iron is the dictionary I am altering for The Craft Barn's Dictionary Challenge. I've been asked a couple of times if I can still close the book - well now you can see - yes I can - at the moment - but by the end of the challenge? Who knows!

The strange looking pack of fluff with a pink and green ball (front right) is another early birthday prezzie from my lovely Mum and is a pincushion kit which looks soooo cute!


See what I mean!

I don't know when I'm going to find time to do sewing for pleasure rather than work  - but I promise I'll post pics when it's finished.

If you're in a WOYWW hurry that's all I've got for this week so thanks for popping in and I hope to catch up with you later, but if you're interested in the Julie Nutting Doll project more pics follow...


You may remember a couple of weeks ago I was playing with a Julie Nutting Doll stamp and having a go at an (un-tutored) She Art style layout in my AJ. Well here is the page so far - I can't say that it is finished because I'm not totally happy with it - but I've hit a block so I'm letting it "rest" until inspiration strikes again.


Stamping the flourishes over the girl helped to ground her on the page, whilst the doodle edging gives her some definition.


This is actually the second incarnation of this page which started off looking a lot like this...


The first attempt was gesso-ed over and then begun again with layers of  ink or acrylic paint through at least four stencils, bubble wrap acrylic paint stamping and at least 17 different stamped images.  As I said, I'm not entirely happy with her yet, whether the page is too blue, whether she's too small on the A4 page - I'm not sure - but I'll come back to her and hope for the best.

Thank you for visiting, please do leave a comment so that I know you came and I can reciprocate.


Tuesday, 13 August 2013

Evolution of a Journal Page


Hello again.

In my last post on the faux batik (resist) technique I left you with an ink and resist background for a journal spread. I have been working on that journal spread and thought you might like to see how the page has evolved.

This is how the page looked when we left it:


I have been working on building up layers of interest in the background. (I am at the start of a new journal so I'm trying to keep the pages fairly flat to make working on subsequent pages easier (lesson learned from the Dictionary Challenge!) 

The first layer uses the same five colours of Dylusions I used earlier (Lemon Zest, Squeezed Orange, Pure Sunshine and Fresh Lime and London Blue), but this time randomly sprayed through a circle stencil.


I love the contrast of black stamped images on my journal pages, so I picked a flower themed stamp set, archival ink and set to work, firstly stamping two different styles of flower


and then using the flower centre stamps firstly to break up some of the white circles left by the resist technique,

and secondly to add some more intense black contrast. I don't usually mount my stamps on acrylic blocks when I'm layering in a background, preferring the partial stamped image you get when you "roll" the inked stamp over the page using your fingers. This time however I did mount the stamps as I wanted a crisp image.

The picture below also shows the next step, which was to colour with a POSCA paint pen through the circle stencil. The POSCA pen gives a lovely matte, chalky and slightly textured finish when dry.


I recently bought a Paper Artsy Minis stamp (MN72) which is an ink splatter image (I know what you're thinking - "You can achieve that look by flicking ink at the page - why would you buy a stamp?" well... sometimes I think you need a bit more control)


I thought I'd give the stamp a workout and I was really pleased with the results. (This stamp will be on the "stamps to be kept close at hand" pile from now on!)

Cunningly the next photo shows the effect of the stamped ink splatters (black) and genuine Dylusions White Linen (er - white) splatters - now, which looks more like your idea of an ink splatter? I rest my case m'Lud.


All the layers of images on the page were looking very circular and "blobby", so I decided to add a little contrasting shape by printing black lines with archival ink using a cut up credit card.


Finally I added a some stamped text (Chocolate Baroque's  Artistic Affirmations - LOVE these stamps!)


Here is the "finished" background - who knows - I might go back in and add something else at a later date - that's the beauty of art journaling...


The observant amongst you will have noticed that I've only shown you one side of my two page spread. I will be posting a Part 2 to the faux batik technique tutorial which will show a different look using the same basic technique, so do keep an eye on your blog roll or bloglovin' feed. You can now see Part 2 here.

Thank you for stopping by.

Friday, 9 August 2013

Faux Batik (resist) Technique - Photo Tutorial - Part 1


Hello friends!

I had so many lovely comments about the faux batik tag I posted on Wednesday that I thought you might be interested in a quick tutorial. This post is photo heavy but I think it helps make sense of the technique.

I learned this technique at the monthly Art Journaling class I attend at Crafty Bunch in Telford so I must thank our lovely and super talented teacher Kaz Hall for kindly allowing me to share the technique with you. You may have seen some of Kaz's work in recent issues of Craft Stamper, if not pop over to her blog The Little Shabby Shed and check out her amazing work, she's a really lovely lady and always happy to welcome new visitors.

On with the show then...

Firstly a reminder of the sample tag I posted on Wednesday...


There are two things to keep in mind as you look at the tag, firstly the cardstock is manila cardstock (I'll come back to this later)  and secondly the photographs have been taken directly under a halogen bulb so you are seeing a very exaggerated sheen on the piece.


For the tutorial I am going to show you the same technique, but instead of on a tag it will be a background for a journal spread and will be on white cardstock, 

The idea behind this technique is to create a design which resists the coloured ink you are applying to make your background, leaving the design in the substrate (cardstock) colour rather than as a black or coloured stamped image.

You will need:

Embossing Ink (such as Versamark)
Clear embossing powder
Heat tool
Scrap or brown paper (not greaseproof)
Your chosen substrate, eg cardstock, tag, journal - a light colour will work best
Stamps and or stencils
Dylusions spray inks
A kitchen roll
Iron
Heatproof surface (eg craft mat)

Step 1.

Ink your chosen stamp with heat embossing ink and stamp the image on to your cardstock.  (You can also press the Versamark through a stencil. (Make sure you clean your stamps and stencils carefully afterwards as embossing ink is very sticky))


Step 2.

Pour clear embossing powder over your inked images. If you are doing a large project (mine is a double A4 spread) you may need to repeat steps 1 and 2 rather than do it all in one go so that your ink doesn't dry before you get your embossing powder on. I completed my stamped images in one step and then the stencilled images in another.


Shake off the excess on to a piece of scrap paper and return to the pot.


Don't worry if you have some specks of embossing powder floating around it all adds to the effect

Step 3.

Melt the embossing powder with a heat tool - enjoy the magic!


Step 4.

Working quite quickly, spray your inks randomly over your cardstock, you will get great blends where the colours overlap. You can also spritz with water to get the trademark Dylusions reaction look. Be careful not to over ink or you will get a very muddy colour.


Roll a full kitchen roll over the wet ink to take off the pooled ink before adding more colour in the spaces if necessary (this helps stop the muddiness). Repeat this again when you have finished inking to remove all excess ink.


You can see where the heat embossed images have resisted the ink.


Step 5.

Place scrap or brown paper over the cardstock (if using brown paper place it shiny side UP) and then iron over it with a reasonably hot DRY iron (DO NOT STEAM)


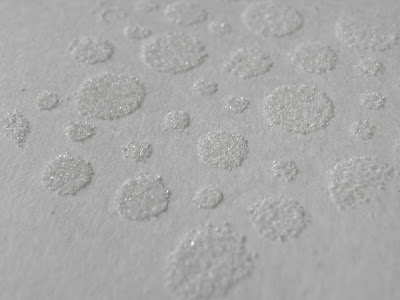
Eventually you will see "greasy" looking areas appear on the scrap paper, this is the embossing powder melting and being lifted off.


If, when you come to lift your scrap paper off, you find that it has become stuck, simply re-iron until it comes free.

Your finished faux batik piece will show your stamped/stencilled design in the colour of the substrate on a coloured  background.


You can then go on to decorate this further. In the tag above I have over stamped the same foliage stamp in black archival ink to make it pop and I've added some gold metallic dots around the leaves.

The technique followed was exactly the same for both samples but you will notice the two very different effects given by the colour of the substrate, the tag (manila) has given a lovely golden glow to the batik effect, whilst the journal spread (white) is quite a stark contrast. 

The sheen on the tag has come from sections of the embossing which haven't quite lifted off when ironed. You could experiment with different iron temperatures to see which effect you prefer. 

I do hope you will have a play at this technique,  all of my classmates really enjoyed trying it and we had some great - and surprising results.

I'm off to work on this page some more. Thank you for looking. Enjoy!


P.S. You can see how this page is coming on here
P.P.S. You can find Part 2 of the tutorial here


Related Posts Plugin for WordPress, Blogger...